Spray painting anodized aluminum is a great way to restore or change the appearance of metal surfaces while adding a layer of protection. The aluminum is anodized, which has a tough oxide coating to resist corrosion and wear. Nonetheless, there is a stage at which even the anodized aluminum would reveal an aspect of aging or fading, and this is where the spray painting would be used.
In case you are in Christchurch, New Zealand, and you need to know how to prepare and paint anodized aluminum correctly, this guide will give step-by-step instructions, tips to follow, and the resolution of the most common problems that happen.
What Is Anodized Aluminum?
Aluminium that has undergone an electrochemical process to form a protective oxide coating on its surface is called anodized aluminium. This anodized coating improves the natural ability of the aluminum against corrosion, wear, and damage by UV. It may also be coated in a sleek, matte finish or even a colored finish, which may be frequently observed in architectural work, window frames, outdoor furniture, and in car parts.
The Preparation of Anodized Aluminum for Spray Painting
Anodized aluminum requires correct surface preparation to be able to paint a long and smooth finish. Here’s how to do it right.
Wipe the Surface Clean and Degrease
It is necessary to clean anodized aluminum before starting. The adhesion of the paint can be influenced by any of the grease, dirt, or grime. Wipe with a degreaser or a weak detergent that is added with warm water to clean the surface thoroughly. It is then washed, rinsed with clean water, and dried thoroughly. It is important to use a clean surface so the paint will stick better and achieve a smoother finish.
Aluminum Sanding and De-glossing.
Anodized metal (aluminum) usually has a smooth and shiny surface. To have good adhesion of paint, the surface must be abraded or deglossed slightly. Fine-grit sandpaper (320 to 400 grit) can be used in this step. The sanding of the anodized aluminum not only eliminates the shine but also provides an off-profile in the surface of the aluminum material that enhances bonding and resistance to peeling.
Apply a Self-Etching Primer
A primer is to be applied to the surface after the surface is ready. A nice primer provides a good base on which the paint is to be applied and makes it hold firmly to the anodized aluminum. Self-etching primer is the most suitable primer to use on anodized aluminum. The bond between this kind of primer and the aluminum is done chemically, which offers the paint a better adhesive surface. Use the primer in fewer coats and leave it to dry completely before proceeding to the next step.
Spray Paint Application
At this point, the spray paint can be applied to the already prepared and primed aluminum. Select a good paint that is meant to be used on metal. Anodized aluminum is a good choice for acrylic, enamel, urethane, and epoxy-based paints. The paints have high UV resistance and increased durability that suits an outdoor application.
The paint can be sprayed using an aerosol spray can, HVLP (high-volume low-pressure) spray gun, or an airless sprayer. The technique to be used will depend on the size and the intricacy of the object to be painted. HVLP or airless sprayer can be more effective on larger surfaces, such as window frames or door parts, whereas smaller objects can be sprayed using an aerosol can.
Spray about 6 to 8 inches from the sprayer/can onto the surface, making thin, even layers. Do not apply more than one coat at a time. To achieve the best possible, the manufacturer should provide the guidelines on dry time, cure time, and recoat window.
Extra Protection Coat of Clear Coat.
To ensure further protection, particularly where the outdoor use is involved, it is advisable to apply a clear coat topcoat. The topcoat will be clear and will increase the paint’s durability, giving it an additional ability to resist moisture, UV rays, and scratches. Always ensure that the paint has dried before applying the clear coat so that one does not experience such problems as fiskeys and orange peels.
How to repair peeling paint on Anodized Aluminum
When you work with anodized aluminum with peeling paint, there is no cause to panic, as this is a typical problem, but it is possible to resolve it with the help of the correct actions. Improper preparation or weathering is the primary cause of paint peeling because of poor adhesion. These are the top measures to take when repairing peeling paint and making sure that it will last for years to come.
Remove the Peeling Paint
To repair the anodized aluminum where the paint is peeling off, the first thing that should be done is to take off the loose paint or the peeling paint. Here’s how to do it:
Apply Scraper or Wire Brush: Remove the peeling paint with a scraper made of plastic or a wire brush. Do not apply the use of harsh tools, which would ruin the aluminum.
Apply Paint Remover: In case of tough paint that cannot be removed easily by a scraper, use a commercial paint remover on metal surfaces. Do as on product labels and keep well ventilated.
Sand the Surface (Scuff Sanding)
Having peeling paint, you should prepare the anodized aluminum for a new coating of paint. To make the new paint stick to the wall, it is necessary to sand the surface. Here’s how:
Lightly Sand the Surface: Use fine sandpaper (320-400 grit) to grind anodized aluminum. You do not have to strip off the anodized coating, you just have to sand enough to provide a textured surface that is easier to adhere the paint.
Smooth and Even: Sand in a circular motion to make the surface even. Concentrate on the areas that have peeled off the paint, but do not neglect the rest of the areas.
Apply a Primer
The second procedure is deposition of a primer onto the anodized surface of aluminum. A prime example will make the paint stick to the surface and enhance its longevity.
| Select a Self-Etching Primer | Self-etching primers have been developed to bond to anodized aluminum chemically and assist the paint to adhere better. It also enhances peel resistance. |
| Between Coats | Spray or brush on a thin coat of primer. Do not apply too much primer, or it will run or drip. Let it dry out in accordance with the prescriptions of the manufacturers. |
| Drying Time | Make sure that the primer is fully dry. Drying time also depends on the type of primer applied, but nevertheless, one can experience 30 minutes to an hour. |
Apply Topcoat (Spray Paint)
The next thing to do is to apply the topcoat after the primer is dry. The anodized aluminum will be colored and finished again with the topcoat. Here’s how to do it:
Apply quality Paint: Select paint that is metal-friendly. The best types of paints to be used on anodized aluminum are acrylic, urethane, or enamel-based paints since they offer protection against UV radiation and other extreme weathering conditions.
Spray Coat, Smooth, Light: so as to paint in smooth, light strokes. Stay between 6-8 inches from the surface with the spray can and move in a steady, without overlapping strokes. This will eliminate drips or imperfect texture on the paint.
Allow Flash Time: When between coats, wait the recommended time (normally 10-15 minutes) before applying another coat of paint. This guarantees that there are no problems with adherence of every coat and there will be no fisheyes or orange peel.
Add a Clear Coat (Optional)
In addition to this, to enhance the protection, particularly when used outdoors in areas such as Christchurch, it would be reasonable to apply a clear topcoat. This will assist in the prevention of scratches, UV rays, and moisture to your newly painted anodized aluminum.
Apply a Clear Enamel or Urethane Topcoat: Select a clear topcoat that will match your topcoat paint. It should be applied in thin layers, with each layer being dried before applying the next layer.
Durability: A clear coat also provides additional UV protection and eliminates peeling or future damage.
Let Dry and Cure Adequately
Once the paint and topcoat have been put on, leave the surface to dry completely. The correct curing period is of utmost importance in achieving good bonding of the paint and a prolonged duration. The instructions of the paint manufacturer give definite times of drying and curing.
Cure Time: The curing time is between 24 and 48 hours, depending on the nature of the paint and the weather. It is always advisable not to put the item into use or to subject it to the elements before it is completely cured.
Usual troubles and remedies when spray painting anodized aluminum
Although the process of spray painting anodized aluminum is a potentially rewarding project, there are a few challenges that might be encountered. These are some of the common problems and the ways to solve them:
Paint Peeling or Bubbles: It usually occurs due to poor surface preparation. Unless the anodized aluminum was cleaned, sanded, or primed, the paint could not adhere to it. Be sure to clean the surface and use a self-etching primer to improve adhesion.
Fiskeyes are formed when paint is placed on a surface that has contaminations such as grease or oil. To avoid fisheyes, it is important to clean and coat the aluminum with grease, then paint it.
Orange Peel: It arises when the paint has been applied too thickly or at an improper temperature. Thin coats of paint should be applied to prevent the orange peel and spraying within the correct range of temperatures. It is also necessary to have a flash time between coats.
Paint Not Sticking: When the paint does not adhere to the anodized aluminum, a reason could be a lack of surface preparation or application of incorrect primer. Make sure that you apply self-etching primer, and to fix it, a little sanding is applied.
Runs and Sags: This is a result of the excess application of paint in a single layer. In order to prevent the issue of runs and sags, apply multiple thin layers instead of a single thick layer.
Use Cases for Spray Painting Anodized Aluminum in Christchurch
Anodized aluminum is generally spray-painted in a number of applications. Here are a few examples:
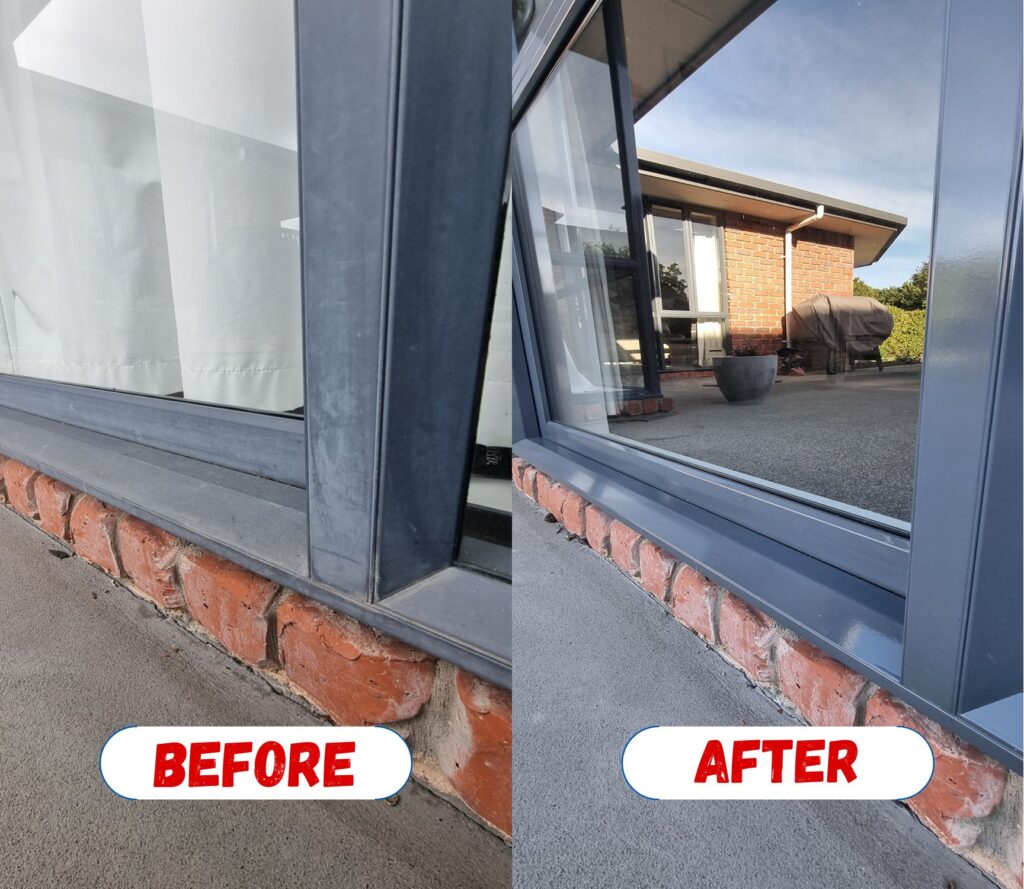
Window Frames: Window frames in most of the homes and buildings in Christchurch have been made of anodized aluminum because they have lasted longer. When your window frames are faded or scratched, you can spray paint and give them a new look as well as added protection.
Railing and Fencing: The homes and business premises in Christchurch feature Anodized aluminum railings and fences. It is possible to prevent corrosion and UV damage and improve the visual appeal of these fixtures by spray painting.
Outdoor Furniture: The climate of Christchurch is harsh on outdoor furniture, particularly those that are fabricated using anodized aluminum. Spray painting also provides a surface to the furniture, besides giving it a UV layer.
Bike and Boat Parts: Bike and boat parts are made of Anodized aluminum because it is strong and corrosion-resistant. Their appearance can be enhanced by painting these parts and increasing their life span.
Architectural Extrusions: Aluminum extrusions, including trim and framing, are mostly anodized. When these extrusions already show signs of wear, spray painting is a great way to restore them.
How To Spray Paint Anodized Aluminum Window Frames.
Prepare the Work Area
Preparedness: Before you start painting, ensure you have the correct tools and materials, and that your working area is clean and well-ventilated.
Tools Needed:
- Spray paint (enamel, urethane, or acrylic)
- Self-etching primer
- Fine-grit sandpaper (320-400 grit)
- Mild or Degreaser soap.
- Painter’s tape and drop cloths or plastic sheets.
- Gloves and a mask
- Tack cloth (for cleaning dust)
Work Area:
Select a dry, dust-free day to spray paint.
Make sure that the place has a lot of air in it in the event that you are working inside.
Place drop cloths or plastic coverings to cover the adjacent surfaces with overspray.
Wash and sanitize the surface.
The initial step in painting aluminum window frames is cleaning them. This will guarantee good adherence of the paint.
Wash the Frames: Use a light detergent and warm water to wipe the window frames of all dirt, grease, or grime.
Degrease: Rub a degreaser onto the surface to remove any oils or residues that could interfere with adhesion.
Rinse and Dry: Clean the window frames with water and dry them using a clean, lint-free cloth after washing.
Scuff Sanding (Abrading the Surface)
The anodized layer on aluminum is stainless and mirror-like, and thus, paint is challenging to adhere to it. You will have to lightly sand or scuff the surface to enhance adhesion.
Sand the Surface: Rough the anodized surface with a fine-grit sandpaper (320 to 400 grit). It is not aimed to strip off the anodized layer but to scratch it or rough it off a bit so that the paint will adhere more readily.
Be Soft: Do not sand it too hard. A very thin layer of sand will produce a more adhesive surface on which the primer and paint will adhere without destroying the aluminum.
Clean Again: Wipe off all sanding dust with a tack cloth after sanding to leave the surface smooth and clean.
Apply a Self-Etching Primer
Anodized aluminum requires a self-etching primer that gives a good bond between the paint and the metal. This kind of primer attaches to the surface in a chemical manner, thereby enhancing adhesion of the paint, thus reducing the occurrence of peeling in the future.
Spray Primer: Spray a skeleton of self-etching primer onto the window frames, at a distance of about 6 to 8 inches.
Even Coats: Coat the primer with a light, even coating and allow each layer to dry following the guidelines of the manufacturer before placing on the next layer.
Drying Time: The waiting period is to allow the primer time to dry up before proceeding to the next step. Depending on the primer and environmental conditions, the drying times usually take between 30 minutes and 1 hour.
Paint the Window Frames with Sprink
The next step is to apply the paint, since the primer is dry. Select a paint that is metal-specific and will be used on metal, i.e., enamel, urethane, or acrylic. These paints are well durable, UV-resistant, and color-retaining.
Select the appropriate paint: Be sure that the paint is aluminum for outdoor applications. Find a paint with good UV coverage, and also paint that cannot be chipped or peeled.
Use Light Coats: The spray can or spray gun must be held approximately 6-8 inches off the surface and sprayed in thin, even layers. Work in long, smooth strokes, overlapping them a little so as to cover evenly.
Allow Dry Time: The time required to allow the paint to dry between coats, as recommended by the manufacturer (typically 10-15 minutes).
Several Coats: Coat it several times with 2-3 layers of paint. Wait and give time in between coats to dry.
The cost of anodized aluminum in Christchurch.
Painting of aluminum in Christchurch, anodized aluminum, and spray painting are some of the most successful methods used to renew and coat aluminum. A high-quality paint with a durable, smooth finish can be attained by making sure that you take the right steps in preparation, cleaning, sanding, priming, and applying a quality paint.
New Look Coatings should be contacted if you are in Christchurch and require professional help with spray painting anodized aluminum. The overall price to have anodized aluminum, such as window frames sprayed with paint, typically relies on several important factors:
Small Joinery and Residential Window Frames
By frame or small set: NZD 150 -350+ on average, depending on the size, preparation, and quality of finish.
Whole house (all aluminium windows): NZD 800 2,000+, depending on the area of the surface and complexity.
Business or Greater Projects
The price is typically adjusted to time plus materials, occasionally billed per hour or quoted on the project size (m 2).
Professional Quote vs DIY
Surface prep, cleaning, degreasing, scuff sanding, primer, and topcoat are included in the pricing for a professional contractor.
DIY prices differ: store paint materials (primer and paint) such as Spraystore Ltd. or Wattyl Paint Centre Christchurch could cost NZD $80 -250 for a small job, but no labour. You still require proper primers and paints, which are made of anodized aluminum.
Frequently Asked Questions
Does anodized aluminum need to be sanded before painting?
Yes, before you paint anodized aluminum, it must be sanded. Sanding the surface is recommended to make it rough so that the paint is able to stick. Scuff the surface with fine-grit sandpaper so as not to damage the anodized coating.
What grit sandpaper for anodized aluminum before painting?
With anodized aluminum, sandpaper with a grit of 320 to 400 is required. This will effectively scuff the surface and provide a superior bonding area for the primer and paint without eliminating the anodized coating.
Best anodized aluminum outdoor primer?
A self-etching primer is the most suitable primer for outdoor anodized aluminum. It chemically attaches itself to the aluminum surface to enhance attachment and has great resistance to peeling and corrosion. To ensure added strength, an epoxy primer may be used.
Best spray paint for anodized aluminum? (aerosol vs spray gun)
Aerosol spray paint, as well as a spray gun, can be used on anodized aluminum, but this depends on the size of the project. Aerosol spray paint is suitable for small work or touch-ups, whereas a spray gun is more controlled and can be used on bigger work to present a smoother and more even finish.
How to paint anodized aluminum without peeling?
In order to paint anodized aluminum with no peeling, make sure that the surface is well cleaned and lightly sanded, and then a self-etching primer is applied. High-quality paint should be applied on metal surfaces, and several light coats should be used instead of one thick coating. Never peel by omitting sufficient time before additional coats are applied.
What is the time of dry primer before topcoat?
Normally, it is recommended to allow the primer to dry for 30 to 1 hour prior to the application of the topcoat. But the time can be different; it can depend on the type of primer, humidity, and temperature. The recommended time to take before applying the topcoat should be as instructed by the manufacturer.