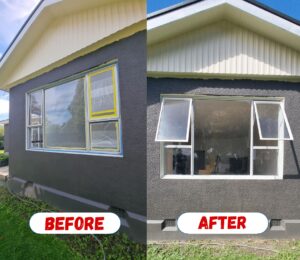
Painting metal surfaces may transform old, rusted materials into new and beautiful ones by spraying. Preparation of the metal to be sprayed is the key to a successful paint job, whether you are sprucing up a piece of furniture, painting a metal gate, or any other larger project. It is even more important in Christchurch, New Zealand, where the weather might not be kind to metal surfaces, to make sure that the metal is properly prepared before spraying it with paint.
You can paint over powder coating, but this must be properly cleaned off, lightly sanded (180-220 grit) to scuff the smooth surface to accept the paint, and a good bonding primer is required before coating it with your final paint.
This guide will discuss spray painting over powder coat, provide tips and techniques, and give you a complete recipe for a perfect finish. You can be fabricating metal furniture, automotive parts, or appliances, but this article will make you approach the job with confidence.
The importance of Metal Surface Preparation
The reason why you want to jump into spray painting metal is to know the importance of surface preparation of metal. Regardless of whether you are spraying steel, aluminum, or any other type of metal, having a well-prepared surface will ensure that your paint is applied properly. Without preparing the surface correctly, your paint job may not last long, as it may start peeling off, rusting, or give an uneven finish.
Improved Paint Adhesion
The paint will have better bonding on a rough surface that is clean.
Durable Finish
Your metal object will also last longer, even in the rough Christchurch weather, with proper preparation.
Smooth Appearance
Proper sanding and priming give a smooth, flat finish that improves the appearance of painted metal.
Steps for Preparing Metal for Spray Painting
These are the key procedures that should be followed when pre-painting metal surfaces that are to be painted in a smooth, professional way.
Step 1: Cleaning Metal Before Painting
Cleaning is the initial process of metal painting preparation. Spray painting requires cleaning the surface, as dirt, grease, and oils may not allow the paint to adhere. This requires that you eliminate any contaminants in order to have a smooth finish.
How to clean metal:
- Apply a de-greaser or a solvent, such as acetone or mineral spirits.
- Clean the surface with a rag or cloth. Do not forget to wipe off dust or grease.
- In cases of bigger metal objects, a pressure washer can be used to remove dirt or any debris.
Special cleaning agents applied to metal surfaces can prove to be quite helpful in the removal of such contaminants as oils and dirt.
How to: In Christchurch, where salty air and humidity may cause corrosion to the metals, cleaning becomes even more essential to make sure that the paint is not corroded.
Step 2: Rust Removal from Metal
In case you are dealing with an older metal or an object that has been exposed to the elements, then you may be experiencing rust or corrosion. Removing rust in metal is considered one of the most significant processes in putting down metal in primer and paint. One of the important stages in this process is the application of rust inhibitors, which prevent any future corrosion.
How to remove rust:
- Removal of loose rust can be done using a wire brush, sandpaper, or a power sander.
- When dealing with rust that is more stubborn, either a rust remover can be used, or abrasive methods of cleaning, such as sandblasting the surface, can be used to fully clean it out.
- Once the rust is gone, rinse the surface again.
The climate in Christchurch is known to speed up rusting, and therefore, corrosion prevention products can be used to extend the service of your metal surface.
Step 3: Metal Sandblasting before spray painting.
One of the most significant stages in the preparation of metal paintings is sanding. It gives it a coarse texture so that the paint sticks. Sanding is also used to level out the flaws or remaining rust spots.
How to sand metal:
- Begin with medium-grit sandpaper (such as 120-grit) to cleanse off any rough edges.
- In bigger works, a power sander may be useful.
- Sand all the metal surface uniformly so that it becomes smooth.
- Get the last bit of finer-grit sandpaper (such as 220-grit) to a smooth surface.
Also, it is possible to treat some kinds of metal, like aluminum, with metal etching solutions in order to increase the adhesion of paint to it. The etching procedure assists in producing small grooves on the surface of the metal so as to provide better bonding.
Step 4: Primer of Metal Surfaces
When it comes to the preparation of metal to be spray-painted, it is necessary to use primer. It serves as a binding agent, which ensures that the paint sticks well, providing an added protection against rust and corrosion.
Types of primer to use:
- A good rust-inhibiting primer is used where there is a possibility of moisture on the metal, such as that in the damp Christchurch environment.
- Etching primer can be used on bare aluminum or steel, and this aids in bonding the paint.
Using the primer, apply in thin even layers. Allow the paint to dry for the required time before you apply your last coat of paint. Paint adhesion promoters may also be included in primers to enhance their efficiency, particularly in the coastal regions such as Christchurch, where metal surfaces are more susceptible to rust and wear.
Step 5: Painting the Metal with Spray.
It is time to spray the metal surface that is now clean, rust-free, and primed. Select a good paint that is supposed to be used on metal surfaces, but ensure that it is suitable for the outdoor environment, in case your project is going to be exposed to the environment.
How to spray paint metal:
- Grasp the spray can at a distance of 6-8 inches from the metal.
- Light, smooth layers of the paint are used to prevent drips.
- Wait till one coat is dry, then apply the next.
Hint: Use several thin coats instead of one thick coat. This will assist in drying the paint and not creating asymmetrical coverage.
Common Mistakes to Avoid When Preparing Metal for Spray Painting
Although it may sound easy to prepare metal in order to be spray-painted, there are various mistakes that can destroy your project. Assure that you do not do the following:
Failure to clean the metal properly
Paint adhesion can be influenced by oils, grease, and dirt.
Skipping sanding
Sanding provides the paint with a rough surface so that it can stick. Otherwise, your paint can easily peel off.
Using the wrong primer
Poor adhesion may be obtained when a primer not designed specifically to stick to the metal type is used.
Applying excessive paint at a time
Dripping and patchy coverage may occur when applying thick layers of paint.
Tips for Metal Spray Painting in Christchurch
Spray painting on metal in Christchurch, this is something that one must take into consideration the local environment. The city location may expose metal to rust and corrosion due to its position at the coastline of the city, and, therefore, it is important to be extra careful when it comes to the preparation. Considering some tips that can help you achieve the best results, here are some of the expert tips:
Select the appropriate paint to use in Christchurch.
It is important to be careful about which paint you select to use in regard to high humidity and occasional rain.
Spray on a dry day
It is not advisable to paint when it is rainy or when it is too humid because this will have an influence on the drying and bonding of the paint.
Ventilation
Whether in the house or on the street, make sure the area is well-ventilated so that the paint can dry and so that you will not inhale the fumes. New Look Coatings has been providing professional metal spray painting services in Christchurch. We have expertise in treating metal surfaces prior to painting, thus giving your projects good preparation before an excellent finish.
Conclusion
The process of preparing metal for spraying is complicated, which helps your paint job last longer and look nicer. Cleaning and rust removal, sanding and priming, each of them is a necessary step on the way to a professional finish. Gathering tips when working with a metal surface, regardless of the size of the project, these tips will assist you in achieving the best outcomes.
FAQs
What type of paint will be applied to powder coating?
Most powder-coated surfaces can be painted with enamel and epoxy-based paints. They are also compatible with metal alloy surface primers.
Is it possible to apply acrylic on top of powder coating?
Yes, it is possible to paint over powder coating. Some of them simply paint their powder-coated products to alter their looks or to preserve them. Powder coatings are invaluably strong and do not wear out or damage easily.
What will dissolve powder coating?
The powder coating can be some of the ones removed with acetone.
What is better than spraying and powder coating?
Powder paint is normally 3-6 times heavier than wet spray paint. The thicker the material is, the better the corrosion resistance and overall durability are in comparison to wet spray paint.
Which primer will be absorbed by powder coat?
You require a primer that is specifically set to connect to tough surfaces. Zinsser Bulls Eye 1-2-3 Primer Sealer is considered to be the most suitable primer for painting over powder coat.
Should powder be sanded prior to spray painting?
Yes. It should be lightly sanded since powder coating is smooth and hard. The 180-220 grit sandpaper is used to create a surface on which the spray paint can bond well.
Which one lasts longer: spray paint or powder coats?
With the right preparation and proper products, power-coated paint over-spray may last for years. Exposure to weather and coastal air is related to longevity.